What are Speech Sounds?
Speech sounds are the sounds in our language that we use to make up words. Each speech sound is produced slightly differently and we expect children to master them at different ages. This page will provide you a list of speech sounds by age along with tongue placement for speech sounds and other placement cues that you can use to help a child learn to pronounce a speech sound correctly.
Speech Sound Examples: /p/, /b/, /m/, /t/, /d/, /n/, /s/, /l/, /r/, “sh”, “ch”, /k/, /g/, etc.
How to Teach Speech Sounds
If a child is having trouble with pronouncing speech sounds, speech therapy can help the child learn to say those sounds correctly. The first step of speech therapy is to teach the child how to say the sound in isolation. That means that you want the child to say the sound by itself, not in a word or syllable.
Choose one sound at a time to work on and pick a sound that is one typically mastered by that child’s age (for example, don’t choose to teach /r/ to a 4-year-old, that’s much too hard!). Below is a chart of speech sounds by age.
Speech Sounds By Age:
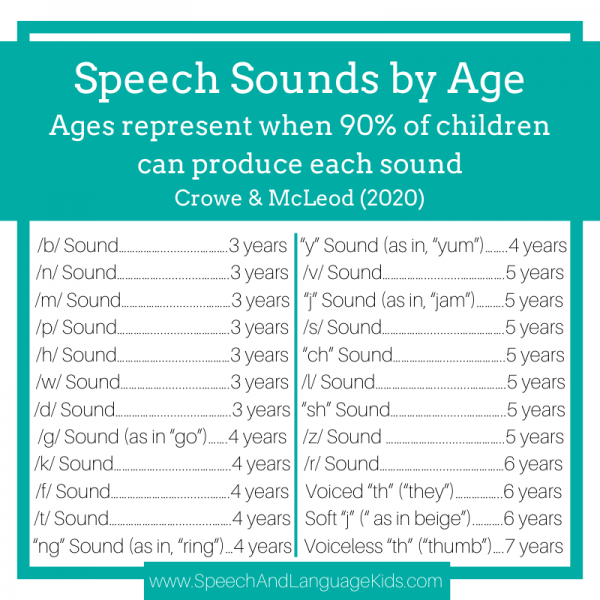
The following sound chart represent the age of acquisition for the English speech sounds. The age below indicates that 90% of children are saying this sound consistently when they turn that age. For example, for the /b/ sound, 90% of children are able to produce the /b/ sound correctly in everyday speech by their third birthday.
Click here to view the research behind this speech sound age chart.
/b/ Sound…………………….3 years
/n/ Sound…………………….3 years
/m/ Sound……………………3 years
/p/ Sound…………………….3 years
/h/ Sound……………………3 years
/w/ Sound…………………….3 years
/d/ Sound……………………..3 years
/g/ Sound (as in “go”)…….4 years
/k/ Sound………………………..4 years
/f/ Sound………………………….4 years
/t/ Sound………………………….4 years
“ng” Sound (as in, “ring”)……4 years
“y” Sound (as in, “yum”)……..4 years
/v/ Sound………………………….5 years
“j” Sound (as in, “jam”)……….5 years
/s/ Sound………………………….5 years
“ch” Sound…………………………..5 years
/l/ Sound…………………………….5 years
“sh” Sound…………………………..5 years
/z/ Sound …………………………..5 years
/r/ Sound……………………………6 years
Voiced “th” (“they”)……………..6 years
Soft “j” (“beige”)………………….6 years
Voiceless “th” (“thumb”)……….7 years
* Keep in mind, most state education departments have their own chart of when children in the public schools qualify for services based on sound. These ages may be different than the research presented here.
Tongue Placement for Speech Sounds (and Other Placement Cues):
The hardest part of teaching speech sounds is helping the child learn the tongue placement and placement for their other articulators. Below are the placement cues and some facilitation techniques for each speech sound. These cues can help a child learn to produce each sound in isolation (by itself, not it words). The child should practice each speech sound by itself until he/she can comfortably say it before moving on to saying that sound in syllables, words, and phrases.
Facilitation Techniques for Sounds in Isolation:
In addition to the placement cues for speech sounds below, try these other strategies for helping a child learn to say a new sound:
- Repetition: Draw the child’s attention to your mouth and then have the child repeat the sound after you first. Exaggerate the sound and make sure you are only saying the sound by itself, not a full word with the sound.
- Use a Mirror: Have the child watch your mouth as you say the sound, then have them watch themselves in a mirror. This will allow them to get their lips, tongue, and mouth into the correct position.
- Use Tactile Cues: Use touch cues to help the child understand where to put his/her articulators. For example, if the sound requires the child’s lips to touch, have him use his fingers to touch his lips first to feel where that sensation should occur. If the sound requires the tongue to touch the roof of the mouth (such as /t/, /d/, /n/), use a tongue depressor to tap the roof of the mouth where the tongue should touch (right behind the front teeth).
- Use Other Sounds: This technique is called co-articulation. Use a sound that the child can produce correctly to facilitate production of a similar sound. For example, if they are having trouble producing the /s/ sound, we can use /t/ because the tongue is in the same position. Have them say a few /t/ sounds and then tell them to “explode” it out (or elongate it) to make it into an /s/ sound. (ex: “t…t…tssss”)
Need More? We have in-depth videos on how to elicit every speech sound inside The Hub! Join Today!
How to Teach the /b/ Speech Sound
To produce the /b/ sound, use the following cues with the child.
- Watch My Mouth (this will help him see what your lips are doing)
- Put your lips together
- Make your lips pop
- Make your voice hum/Turn your voice on
Help your child push his lips together with his fingers if he’s having trouble getting them closed
How to Teach the /p/ Speech Sound
If the child is having trouble with /p/, use the same cues as for /b/ but you will not tell her to turn her voice on. You can have her whisper the sound if she’s making it sound like a /b/ instead of a /p/.
How to Teach the /w/ Speech Sound
To make the /w/ sound, have the child start by saying “oo” like in “boo” and then slowly move the lips apart to say “uh”. It should sound like “oooouuh”.
How to Teach the /m/ Speech Sound
The /m/ sound is produced by pushing the lips together and humming. Have the child hold his lips closed and then ask him to hum or turn his voice on. The mouth should not open at all during this sound, all of the air should come out of the nose.
How to Teach the /f/ Speech Sound
Use these cues to help the child to say the /f/ sound:
- Bite your bottom lip (use a mirror to help your child see what she is doing)
- Hold your lip there and blow
You may need to have the child use her finger to keep her lip in the right place.
How to Teach /v/ Speech Sound
To produce the /v/ sound, use the same cues as /f/ except that you will need to have the child hum or turn his voice on. If the child is struggling with this, try having him hum a tune while biting his bottom lip with his top teeth. If the child is struggling to hold his lip with his teeth, have him use his finger to keep it in place.
How to Teach the “th” Speech Sound
To produce the “th” sound, have the child place her tongue tip between her teeth and blow. There are actually two versions of this sound, one with the voice on (like “the”) and one with the voice off (like “thumb”). Have the child hum if it’s the voiced one.
How to Teach the /t/ Speech Sound
To produce the /t/ sound, have the child tap her tongue right behind her top, front teeth. If the child is having trouble figuring out where to put her tongue, use these techniques to show her the right place:
- Touch the spot right behind the top, front teeth with a tongue depressor or sucker. Then tell her to put her tongue in the same spot.
- Put a sticky food, like peanut butter or marshmallow cream, on the spot right behind her top, front teeth. Then, have her lick it off. When you are describing that spot again, call it the sticky spot.
- If the child is able to produce other sounds in that position like /s/, /l/, or /n/, you can use those sounds to get the tongue in the correct position and then change it to the /t/ sound
How to Teach the /d/ Speech Sound
To produce the /d/ sound, you can use the same cues as the /t/ sound, but the child will need to turn his voice on. Tell him this is the loud one. Have the child place his on his neck to feel the vibrations.
How to Teach the /n/ Speech Sound
For the /n/ sound, your child will need to put her tongue in the same spot as the /t/ sound (see the cues mentioned for /t/). This time though, your child will hold the tongue in that spot while she hums or turns her voice on. If she is having trouble turning her voice on, have her hum a tune while holding her tongue in that position.
To help the child learn to direct air through her nose for this sound, place a mirror below her nose. Show her that when she says the /n/ sound, the mirror fogs up right below her nose. If the air goes through her mouth, the mirror will not fog up.
How to Teach the /s/ Speech Sound
For the /s/ sound, have the child put his tongue in the same place as /t/ (use the placement cues from /t/) but then blow air out. We call this the snake sound! The child should blow air over the top of the tongue. The sides of the tongue should be pushed against the upper back teeth. Use these cues if the child is having trouble:
- If the child is sticking his tongue out too far, look in a mirror and tell him to keep his tongue behind his teeth. You can practice smiling so that his teeth are touching and there is no place for the tongue to peak out.
- If the child is making a lateral lisp (with air coming out over the sides of the tongue), help him feel that the sides of the tongue should push against the upper back teeth. Touch the sides of his tongue with a tongue depressor so he feels what part, then ask him to push that part against the upper back teeth. Use a mighty mouth or other visual aid to show him what you mean. Have the child say the “eee” sound and feel where the back of the tongue is. This sound is usually produced with the tongue high and back against those teeth.
- Use other sounds to facilitate the sound with proper air flow. For example, start with /t/ and “explode it out”. Say “t…t…t….tsssss” and elongate the last /t/ sound so it sounds more like an /s/ (don’t call it an “s” right away though or the child might revert to his original production). Or, start with the “th” sound and then have the child slowly pull his tongue back into his mouth until he stops on the right spot.
- Watch the video below for more tips
How to Teach the /z/ Speech Sound
For the /z/ sound, use the same cues a /s/ but this time your child will need to hum or turn her voice on. You can have her practice turning her voice on by humming a tune while saying the /s/ sound. The video below will demonstrate facilitation techniques for both /s/ and /z/.
How to Teach the /l/ Speech Sound
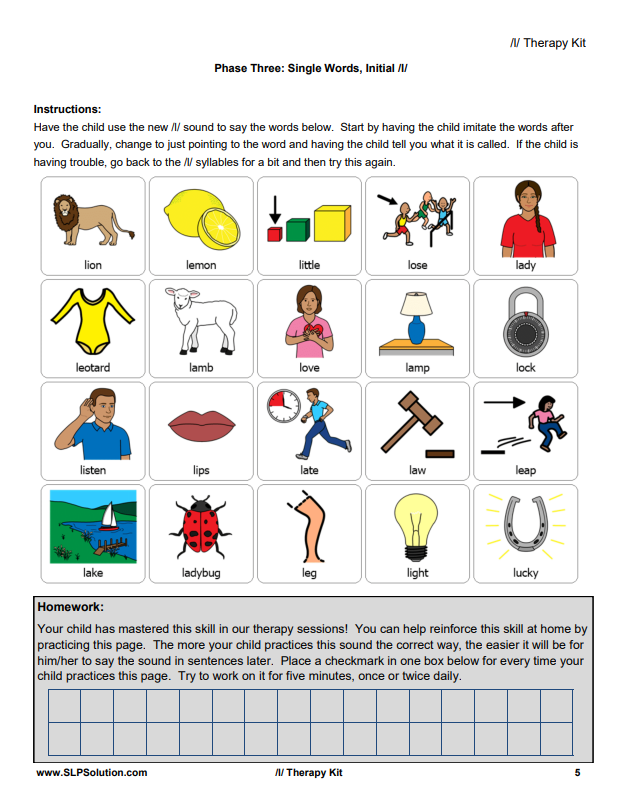
- For the /l/ sound, have your child slowly move his tongue up to the /t/ spot and back down again (see the facilitation techniques for /t/ above). While he’s doing this, have him hum or turn his voice on.
- Sometimes, it helps to have the child stick his tongue way out of his mouth and start the /l/ sound and then slowly pull it back in to the correct spot.
- If the child is flipping his tongue and curling it up, prompt him to tap it lightly to the roof of his mouth instead of holding it there. Use a mirror to show him the difference between a curled tongue and a flat tongue.
- The /l/ at the ends of words is a different type of /l/ called a dark /l/ (the beginning /l/ is a light /l/). Work on the light /l/ first and don’t worry about the dark /l/ right away as that one is harder.
How to Teach the “y” Speech Sound (as in “you”)
To produce the “y” sound, have the child start by saying “ee” like in “bee” and then slowly open the mouth to say “uh”. It should sound like “eeeeeuuuhh”. You can practice it with different vowels at the end as well. If the child is putting a pause between the two vowels, cue the child to stretch it out and keep her voice on the whole time.
How to Teach the “sh” Speech Sound
I call this the quiet sound. To make this sound, have the child form her lips into a square and blow. The square lips are not as small as a pucker (like you would produce for “oo”) but is not all the way open. It’s a halfway position, rounded but not all the way. Use a mirror to get the lip position correct. Once the child has her lips in the correct position, have her blow to make the “sh” sound. If the child is saying /s/ instead of “sh”, ask her to pull her tongue back towards the back of her mouth and drop the tip of the tongue down.
How to Teach the “zh” Speech Sound
This is the sound heard at the end of the word “beige”. This one isn’t very common in our language but it’s produce the same way as “sh” except with the voice humming or turned on. Start by establishing the “sh” sound and then have the child place his hand on his neck and feel the vibrations as he turns on his voice.
How to Teach the “ch” Speech Sound
This sound is produced by saying “t” and “sh” quickly together. Start by establishing a good “sh” sound first. Once that sound is very well established, you can start on this. Have the child push her tongue flat up against the roof of the mouth. Tell her to apply some pressure and then explode that sound out into a “sh” sound. You could also start with a /t/ sound and then explode to the “sh”, such as “t…t….t….tshhhhhh”.
Join the Hub to Access the “ch” no-prep therapy kit and training videos
How to Teach the “j” Speech Sound
The “j” sound is made by saying the “d” sound and the “zh” sounds very quickly together. You can come at this one a couple of ways:
- Start with the “ch” sound. Make sure the child has a really good “ch” before you move on to this one. Explain to the child that this sound is made the same way but it is voiced. Have the child turn on their voice to say this sound.
- Try starting with the “zh” sound (as in beige). Have the child push their tongue up to the roof of their mouth and add some pressure by pushing a little without making any sound. Then, explode out into a “zh” sound. You can also try explaining it other ways such as making it a hard “zh” or a forceful “zh”.
Join the Hub to Access the “j” no-prep therapy kit and training videos
How to Teach the /r/ Speech Sound
The /r/ sound is a very tricky sound to produce. There are actually two different ways of producing this sound, one with the tongue scooped like a bowl and one with it curved like a mountain. For each person, one of these ways will feel better than the other but you cannot force someone to say /r/ in the way that isn’t natural for them. What you have to do instead is figure out which way they do it best. The easiest way to do this is to listen for any words with /r/ that your child says well. For most children, there are a few words that they can say with a good /r/ already, you just have to be listening for them. Once you find that word, have your child hold out the /r/ in the word so she can feel what a good word sounds like. Then, try to find other words that use /r/ in the same way. For example, if your child can say “car” well, try first to get other words that end in “ar” like “bar” and “far”. Once your child can do those, move to words that are similar, like “aardvark” or “marshmallow”.
Facilitation Techniques for the /r/ Sound
If the child isn’t already producing a good /r/ sound naturally, you can use facilitation techniques to help the child. We’ll start with “square lips” which is the natural lip position we make when saying “shhhh”. The lips are rounded but not all the way like an “oo”. If you look in the mirror, they look more like a square than a circle. Practice this lip position until the child can produce it. Then, help the child understand that the sides of the tongue will push against the inside surface of the upper, back teeth. If you have the child say “eee” the tongue should be in that position. Then, help the child keep the tongue in the same position while squaring the lips. Then have them try to imitate an /r/ sound.
There are a lot more tricks that you can try to elicit the /r/ sound. For more /r/ ideas, check out our /r/ techniques video here.
How to Teach the /k/ Speech Sound
To produce the /k/ sound, the child will need to get his tongue to the very back of his mouth. If the child is having trouble finding the right place for his tongue, use some of these placement cues:
- Get a small sucker (like a dum-dum) or a popsicle stick. Gently push down the front of the child’s tongue so that it cannot rise up to say a “t” sound You can also push his tongue back slightly with the sucker or stick to move the tongue backward. Show him this on yourself first so he doesn’t get scared. You can also have him hold the sucker or use his finger to hold it down.
- Have the child lay on his back while saying this sound. Gravity may help him drop his tongue back.
- Using your thumb, gently push up and back on the soft spot on the bottom of your child’s chin. This may get the tongue back to the right position.
- Have the child make a dinosaur stomping noise by producing a /k/-like sound loudly in the back of the throat. Don’t tell the child that you’re making the /k/ sound. Children are sometimes able to imitate sound effects better than speech sounds.
- Have the child cough or gargle water to help him feel where in the throat the sound should be made.
How to Teach the /g/ Speech Sound
The /g/ sound is produced the same way as the /k/ but with the voice turned on.
Watch the video version of how to produce /k/ and /g/!
How to Teach the /h/ Speech Sound
The /h/ sound is produced by making puffs of air at the back of the mouth. Have your child pretend to pant like a dog to make this sound. You can also try having the child puff air onto his hand or a mirror (kind of like what you do when you are outside in the cold and want to see your breath).
The Next Steps in Speech Therapy when Teaching New Sounds
When we are using an articulation approach to speech therapy, saying the sounds in isolation is the first step. Studies show that children who are able to say a sound in isolation are more likely to learn those sounds in conversation on their own (without therapy). So working on sounds in isolation is great to do with all children with speech sound problems.
Once the child can say a sound in isolation, we can continue the articulation therapy process by working on the sound in each of the following stages:
- Syllables: Speak the sound in nonsense syllables, like “ba, bo, boo, bee, bay, bi”
- Words: Speak the sound in words, like “ball, bat, elbow, rub, crib”
- Phrases: Put those words in short phrases, like “my ball” or “in the crib”
- Sentences: Use the sound correctly in sentences, like “I see a ball and a crib.”
- Short Response: Use the sound correctly when giving short responses to prompts like “what did you do at recess” or “tell me all of the steps to brushing your teeth”.
- Conversational Speech: Use the sound correctly in everyday conversation.
Additional Resources for Teaching Speech Sounds
Our articulation therapy kit will provide you everything you need to teach speech sounds to a child. This kit has materials for every English consonant at every level (from isolation to conversation). Or, check out our course with continuing education certificate for learning how to elicit speech sounds in isolation.
Free Therapy Materials for Teaching Sounds:
Check out the freebies that we have inside our Free Therapy Material Library!
Operation Better Speech!
Home Program for Teaching Sounds

/f/ Speech Sound Home Program
CV, VC, CVC, and CVCV
Flashcards and Worksheets
(For practicing speech sounds in shorter words)

About the Author: Carrie Clark, MA CCC-SLP
Hi, I’m Carrie! I’m a speech-language pathologist from Columbia, Missouri, USA. I’ve worked with children and teenagers of all ages in schools, preschools, and even my own private practice. I love digging through the research on speech and language topics and breaking it down into step-by-step plans for my followers.
Fun Fact: Sometimes I have a hard time shutting my brain down at the end of the day. My strategy of choice is to take a hot bath or shower and then read a book. The best books for helping me shut down are sci fi or fantasy because they very rarely resemble my real life at all. I also tend toward young adult novels when I need a brain break because they take less mental energy.
Connect with Me:







Thank you so much for this post. My three-year-old can now say the /g/ and /k/ sounds thanks to the advice you gave here. It is so rewarding to both of us to hear him say these correctly!
YAY!! That’s awesome! Let me know if you have any other questions!
Great advice 🙂 I will be trying these out! Thanks!
Awesome! Glad you enjoyed it!
I would love your advice. I have a son who will be 8 in a couple weeks. He is trouble with the L sound at the end of a word, for example bowl and bull both sound like bowl. He once wrote down the word table by sounding it out and he wrote tabo because he pronounces it taybo. He can make the L sound fine in the beginning of a word. How would I address this? At his age should he be in formal therapy? Thank you!!!
Hello! /l/ is a sound that can be worked on in therapy at the age of 8. That final /l/ is often called the “dark /l/” and it can be very tricky to teach! A few sessions with a speech therapist should help a ton though!
Thank you!!
Hello,
I love your site, and all of your information! I am helping to raise my 8 yr. old grandson, who has ASD and PDA (pathological demand avoidance). He is undiagnosed thus far. He has some speech and language problems, which we can’t viably deal with, with a speech therapist yet, due to extreme anxiety.
He is not willing to work with a person showing him a speech sound, but is willing most of the time to watch a person on the computer or tablet i.e. You tube videos. I use a lot of this in teaching him anything (He is homeschooled) as he is able to accept teaching better in this way. He has trouble with his l sound , and th sound. I found your you tube video on teaching the l sound, and he watched it with me, and has been practicing it. Yay!
Is there any possibility of you putting out some sort of articulation series via a video format, for children like my grandson? Because , I would certainly purchase it . Thank you for your dedication, it really shines through!
Hey there! I suggest you check out https://gemiini.org 🙂
Hi
Fab website I’ve just found and lots of information to help my son with working on the front sounds with his mouth. His now 4 and still finds the movement of his mouth and making the m,b,p sounds. He has been diagnosed in the autistic spectrum but his main issues as speech as he was very delayed. Although his doing so well now, he really is struggling with the front sounds still and his not having speech therapy which I feel he needs and wondering if you feel aspraxia could be a reason his struggling so much?
Any thoughts on this I would be very grateful.
Many thanks
Helen
Hi, Helen-
You may want to review this blog post regarding Signs, Symptoms of Childhood Apraxia: https://www.speechandlanguagekids.com/symptoms-diagnosis-childhood-apraxia-speech/.
My 7 year old son is non-verbal and types to communicate. He says he is unable to produce sounds. How do we help him? Can he be physically unable to produce sounds?
Hello! is this site not monitored anymore?
Hi there! Yes, this site is still monitored. Can we be of any help?
My 7 year old son is non-verbal and types to communicate. He says he is unable to produce sounds. How do we help him? Can he be physically unable to produce sounds?
This has been helpful for me so far and hopefully my 3-yo son also. He turned 3 about two months ago and has fully mastered all of the “by age 3” sounds on your list. He is tall for his age and has a large vocabulary (although most of it mispronounced) and that has lead to a lot of people suggesting he is speech delayed and needs intervention. His older sisters were both early talkers with huge vocabularies and were easily understood by strangers before turning 3. In comparison to them, he’s behind, but I don’t think his speech is too far behind his peers. My husband and I are trying to decide if he really needs help or just more time. Advice?
Is there anyway you can do videos for each sound your talking about? I don’t understand what you mean by most of these examples.
Hello : First of all ,thanks for nice information , my son has five years old , he has the following problems :
* Pronounce the wods from nose .
*The speach is very slow.
*And also mentally not perfect development .
Could you please help me and give information how to solve the problem of my child,should say ,the Neurologist doctor after three year treatment decided that these problems are not Neurological . And stopped the medications.
Hi, Jamil-Please check this link for Carries’s resources on hypernasality: https://www.speechandlanguagekids.com/?s=hypernasality.
Hi, I am a Reception teacher following letters and sounds to teach phonics. r is taught in phase 2 during the autumn term. In this article you mention the teaching/r/ to a 4 year old is just too hard. I’m confused. We’re expected by government to teach /r/ and all letters of the alphabet, phase 3 digraphs and trigraphs by the end of Reception year. Would you say the Letters and Sounds document is inaccurate or suggest certain sounds are not taught in the reception year?
Hello, Rebecca!
Thank you so much for reaching out. Unfortunately, we get a ton of questions every day about how to solve specific speech/language problems. Since we have such a small staff, we aren’t able to answer every question that comes through on the website, social media, or via email. If you are a parent, we suggest you reach out to a local speech-language pathologist who can work with your child directly and answer your question.
If you are another speech-language professional, we have created a membership where we pay a full staff to answer questions like this on a regular basis. We would be more than happy to answer your question inside the membership program. We’re able to answer more questions in here because we have a full library of questions that we’ve already answered so our staff can either link you to the answer if it exists, or write you a custom response if needed. We’d love to see you inside the membership!
Click Here to Become a Member: https://www.slpsolution.com/pediatric-signup/
thank you for the information
It is very important information. Thank you.